Showing posts with label baking. Show all posts

Saturday, 19 January 2013

Year Two: Everything In-Between

Hello!

It's been a long time since I've checked back here and the year has been crazy long. I've done a lot of things; graduated university, started a job, acquired a second beautiful nephew. 

Of course, all you guys care about is the baking and it's time I started up again! But while I think of something to bake, why don't I share a few of the ones I did over the last year...

Mini Cheesecakes


Evaluation

5/5 stars: Taste.
4/5 stars: Ease of Recipe.
4.5/5 stars: Presentation. The first batch were a little untidy as I took them out too soon but the second were gorgeous.
3/5 stars: Time. It's worth it, but be aware you've got to leave them in the freezer overnight if you really want them to set and decoration is fiddly and therefore takes time.
5/5 stars: Overall success. I've made them about three times now and they always go down wonderfully!

Original Recipe
http://www.finedinings.com/mini_cheesecake_recipe.htm
________________________
I changed the recipe a lot. Mostly because it was American measurements. I didn't use the nuts, I used caster sugar instead of granulated, I used lemon/ lime juice in the citrus ones. Just a tiny bit of each. I used ginger nut biscuits as the base of the citrus ones to give them that extra kick. I didn't use corn starch. I used fresh fruit. This is basically one of those recipes you have to rip to shreds to get something good out of. But when you have, it's excellent. 

Please note: Since I'm doing a few of these I'll just post original recipes and note changes I made for each, but if you do want to make any of them e-mail me at contactheatherwarren@gmail.com and I'll get it for you! I have a paper copy of most of them and don't mind typing them up if there's interest.


Halloween Buns


Evaluation

4/5 stars: Taste. The ghost ones were more like a 3.5 as they were just too much icing but the bn mixture was moist and tasty and the chocolates on top of the others made them very yummy.
5/5 stars: Ease of Recipe.
4/5 stars: Presentation. We got lazy! We were already tired and there was a limited time to decorate, but they still turned out pretty cool and spooky.
4.5/5 stars: Time. Depends how long you want to spend decorating. The buns are quick and easy, the decorating a little less quick but still less than an hour to make them all.
5/5 stars: Overall success. Great fun!

Original Recipe

A very basic bun recipe and then we used a few sites as inspiration for the decor and used fondant icing. 


Christmas Chelsea Buns


Evaluation

4.5/5 stars: Taste. A little bit less filling next time but other than that, awesome!
4/5 stars: Ease of Recipe.
5/5 stars: Presentation. Look how beautiful and golden brown they are!
3.5/5 stars: Time. You need to leave the bread to rise so it does take a long time, but you've got to be prepared for that if you want home made bread.
5/5 stars: Overall success. These were a really great thing to make and a good way to eat through some of that leftover turkey. I'm not going to lie though, we had to make a new pack of stuffing as we did not have enough left over and you've got to have plenty of cranberry jelly in the house.

Original Recipe


 http://www.bbc.co.uk/food/recipes/turkey_stuffing_and_77957

Add in some fresh cranberries as they make them taste and look so much better! Use a little less turkey and don't worry so much about the rolling. We didn't stretch ours as much as he suggested and they came out fine. Also, keep a good eye on them in the final stages. You don't want to over-cook them.


Saturday, 3 September 2011

Chocolate Truffles


The Evaluation

5/5 stars: Taste.
5/5 stars: Ease of recipe.
4.5/5 stars: Presentation.They were a little tricky to roll after a while as your hands got all sticky, but then we realised we just needed to re-wash our hands every now and then.
4/5 stars: Time. The prep. time isn't lengthy at all but you do have to leave the mixture in the frigde to solidify and then again, the truffles taste way better if they've been in the fridge for another hour after decoration.
5/5 stars: Overall success. Will defineately make these again!

Original Recipe: 
http://www.joyofbaking.com/ChocolateTruffles.html
_____________________
The recipe is great, there's even a video you can watch to see how it's done and everything is so easy. Many thanks to my younger sister Sarah and best friend Hannah for helping decorate (and eat) these! We rolled them in white chocolate, cocoa powder and milk chocolate, sometimes just the one per truffle, other times all three for a fun mix of flavours. Try them!


Assorted Cookies


The Evaluation

4.5/5 stars: Taste. The smartie cookies were probably my least favourite and the oatmeal and raisin my best but different people liked different ones and everyone agreed that they were all great so yay!
5/5 stars: Ease of recipe.
5/5 stars: Presentation.
5/5 stars: Time.
5/5 stars: Really quick and easy to make and very tasty.

Original Recipe: A basic cookie recipe from one of my books and then I tinkered for each type of cookie. For the cherry and white chocolate ones, I just chopped up some of each and threw it in. For the oatmeal and raisin, I replaced some of the flour with oatmeal and added a handful of raisins. For the triple chocolate chip I used cocoa powder instead of some of the flour and added three types of chopped chocolate. Then I also did a couple of normal chocolate chip as well.
________________________________________
This was at the beginning of August and I made them for my work crew as it was the last week working at the factory. If you want the basic cookie recipe I used, just ask and I'll type it up but it's also easy enough to find around the web. Yes, I know I'm being a bit lazy but shhh. I'll start typing out the recipes again next week :)


The Birthday Cakes

Cake One: Mum's Cake


The Evaluation

3.5/5 stars: Taste.A little sickly - too much butter-cream.
5/5 stars: Ease of recipe.
3/5 stars: Presentation.Not the best photo but not the best presentation either.
4/5 stars: Time. Not too lengthy.
3.5/5 stars: Overall success. It was good cake but could have been better.

Original Recipe: I just used a simple chocolate sponge base and then chocolate buttercream and sprinkles to decorate.

Cake Two: Claire's Cake


Credit goes to Claire Warren for the decoration! If you scroll down you'll see a photo of her placing the buttons. Also, you should check out her blog! http://modelingandtexturingprogress.blogspot.com/

The Evaluation

4/5 stars: Taste.The vanilla sugar was a little too strong, ordinary caster would have been better.
5/5 stars: Ease of recipe.
5/5 stars: Presentation.
5/5 stars: Time.
4.5/5 stars: Overall success. A pretty tasty cake and thanks to my sister it looks very nice as well :D

Original Recipe: I used a simple sponge and replaced half the caster sugar with vanilla sugar, then giant buttons and vanilla icing to decorate.

Cake Three: Mark's Cake

It's upside down but you get the idea. 

The Evaluation

2.5/5 stars: Taste.This may be biased as I don't really like fudge cake, but I think it was quite poor even by normal standard.
2/5 stars: Ease of recipe.The original recipe was easy enough to follow but it produced a crumbly fudge cake which made the decorating really difficult!
2.5/5 stars: Presentation. Better luck next time xD
2.5/5 stars: Time. It took longer than I'd have liked.
2.5/5 stars: Overall success.

Original Recipe: http://www.nigella.com/recipes/view/chocolate-fudge-cake-168
_________________
 Alright so it's been far too long since I posted on here! These were baked at the end of June and I've not really much more to say. It was a bit crazy making three at once and there were varied levels of success. The tardis cake obviously being quite a fail but never mind! The vanilla cake was the easy favourite, though the chocolate one did get some support and it was lovely in small doses!


Thursday, 23 June 2011

Week 2.1: Cherry Scones

The Evaluation

5/5 stars: Taste. They're amazing.
5/5 stars: Ease of recipe. Very easy!
4.5/5 stars: Presentation. They look pretty appetising :)
4/5 stars: Doesn't take all that long to be honest.
5/5 stars: Overall success.

Original Recipe: http://www.bbcgoodfood.com/recipes/1162675/cherry-scones


Tweaked Recipe:  

Ing.

450g self raising flour
1 tsp bicarbonate of soda
100g butter
2 tbsp caster sugar
284ml butter milk (or get whole milk and add a tablespoon of fresh lemon juice, then wait five mins for it to thicken a little. It's a perfect substitute and what I used ^^)
2 tbsp milk
2 tsp vanilla essence
100g glace cherries, chopped
1/2 tsp salt
Jam and cream to serve or butter is good too
 
Method

1. Pre-heat oven to 200 degrees.
2. Put flour, salt, butter and bicarbonate soda in a bowl. Rub between your fingertips until it resembles breadcrumbs.
3. Mix in sugar.
4. Mix in the milk, vanilla and cherries. Add the buttermilk more gradually until it forms a soft dough. Don't use it all if it looks to be too much.
5. Press dough onto floured surface. Now there's several ways of making these. If you don't have cutters, just roll them into little balls. They will rise but not an awful lot so make them slightly smaller than the size you want. If you have cutters, take a 4/5cm cutter and you have two choices. Either roll your dough to 1cm thickness and make an even number because half will be tops and half bottoms. Or roll to 3cm then you'll be cutting your scones in half.
6. Transfer to lightly floured baking sheet on baking tray. Brush the top of the scones with milk and bake for about 12 mins.

_________________
These were basically perfect. There aren't many left to be honest so I might make another batch at the end of the week. They're quick, easy to make and pretty fun. You can also substitute the cherries for raisings or blueberrys etc. Try them! :)

Week 2: Morello Cherry Pie


The Evaluation

3/5 stars: Taste.
4/5 stars: Ease of recipe. Pretty easy and a good choice for a first pie.
3.5/5 stars: Presentation. Not too bad but a little messy.
3/5 stars: Time to make. This is another lengthy one, especially if you're making the pastry yourself.
3.5/5 stars: Overall success.

Suggested Modifications

1. Pie crust was a little thin so I'd suggest making slightly more dough mixture for the base. Just the base though, the top was fine.
2. Add corn flour with the cherries as the filling was a little runny. Or if using fresh fruit, boil with sugar first to create a syrup.

Original Recipes: 
Just for the pastry mix: http://notecook.com/desserts/pies/morello-cherry-pie/
For the pie: http://www.foodnetwork.com/recipes/sandra-lee/cherry-pie-with-lattice-top-recipe2/index.html

Tweaked Recipe

Pastry Ing. (You need two lots of this, one for the bottom and one for the top.)


140g plain flour
30g Icing Sugar
120g butter
3 tbsp chilled water

Pie Ing.

1 tbsp cherry liqueur
800/ 900g morello cherries
pie crust
flour for dusting
1 egg, lightly beaten
1 tbsp caster sugar
cream/ ice cream to serve

Pastry Method

1. Sift flour and icing sugar into a bowl.
2. Add butter and rub between fingertips. This should resemble bread crumbs by the end.
3. Add water gradually and stir into a dough with a knife.
4. Flour a surface and roll the dough gently into a ball.
5. Roll out dough onto a sheet of baking paper. Cut out a circle slightly bigger than the top of your pie dish.
6. Cover in cling film and refrigerate for twenty minutes. Repeat this process for the top.

Pie Method

1. Pre-heat oven to 190 degrees.
2. Combine the cherries and liqueur in a bowl.
3. Gently lower the bottom crust over the pie dish. Pour the filling in.
4. Cut the top pie crust into strips about 2cm wide. Take every alternate strip and place them horizontally across the top of the pie. Now take the others one at a time. You want to place these vertically over the pie but weave them in and out of the horizontal strips to form the lattice effect.
5. Use a fork to tidy the edge of the pie.
6. Brush the top of the pie with beaten egg and sprinkle the sugar over the top.
7. Bake for 20 mins or until the surface is golden brown. Then cover with foil. You should bake for 40 mins total so if the surface is brown after 20 mins, another 20. If it's after 30 mins, just another 10.

__________________
This is pretty good pie, especially when eaten with ice cream but there were a few stumbling blocks along the way! Not bad for a first one though :)

Tuesday, 14 June 2011

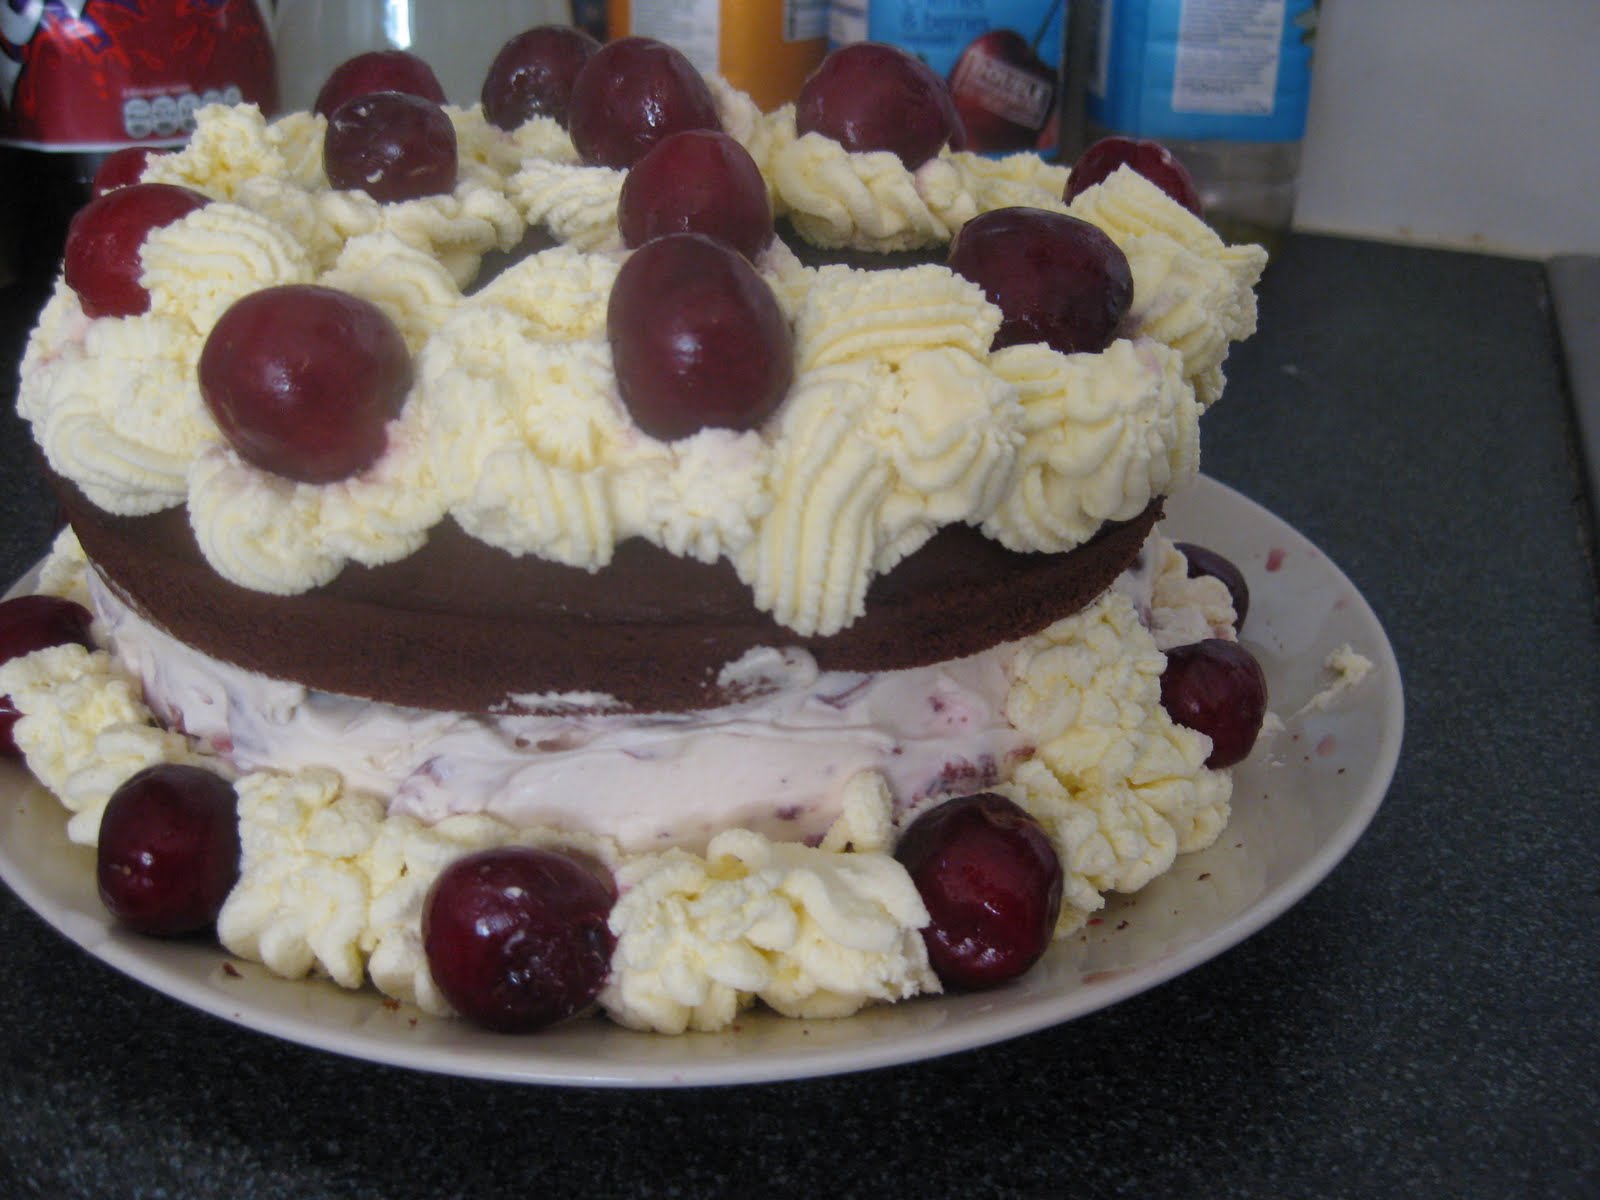
Week 1: Black Forest Gateau


Original Recipe: http://www.waitrose.com/home/recipes/recipe_directory/b/black_forest_gateau.html

Tweaked Recipe: (Please note I am listing the icing sugar but I did forget to put it in)

Cake Ing.

175g butter
175g caster sugar
 6 eggs, seperated
125g self raising flour
75g cocoa powder
1 tsp coffee

Decoration Ing.

50g caster sugar
2 tbsp Kirsch (I used a really nice cherry liqueur that I picked up for £5.99 at Lidl. I imagine cherry flavouring would also work if you're struggling)
350ml double cream (Better to go over than under. I used at least 600ml. Also, if you don't have an electric whisk, you may want to get one extra thick and one normal)
1 tbsp icing sugar (clearly not necessary since I forgot it!)
600g cherries (To make it cheaper, only 400g need to be fresh. The other 200g can come from a jar/ tin of morello cherries. Of course, you can have less than this as you don't have to put any around the bottom if you don't want)
2 tbsp black cherry jam (I used plain cherry. Depends on how strong you want the flavouring and what you can find.)
25g dark chocolate

Method

The Cake:

1. Pre-heat oven to 180 degrees.
2. Line 2 sandwich cake tins.
3. Cream butter and sugar until nice and fluffy, then beat in the egg yolks one at a time.
4. Sieve the flour, cocoa powder and coffee into a seperate bowl.
5. Whisk the egg whites quite a bit, they should start to look a little frothy. Then you want to get your first mixture and carefully fold the other two into it in alternating spoonfulls. Start with some flour and try to end on a little of the egg whites as that mixes in more smoothly.
6. Pour into your tins. Bake for about twenty minutes. Check them after fifteen though and keep a close eye on them as ovens vary, especially crappy student ones. If the cake top is starting to burn but your middle isn't cooked through, cover them over with foil. A friend told me about it and it's a useful trick to know.

 The Decorations:

1. Time to start preparing the decorations. Chop up the 200g of cherries that aren't fresh and then set those aside for a moment while you whisk your cream. If you have a hand whisk like me, you'll want to mix the thick and normal cream together in stages. You want all the thick in there and then like 100ml of your normal cream to start with.Whisk. Then add another 100ml and whisk again and then the last 100ml. If you're all fancy you and your electric whisk should be able to handle this part on your own ;)
2. Add the icing sugar to your cream! Or just forget like I did. That works too.
3. Split your cream into two halves. You want slightly more in one half and to this you're going to add the chopped cherries. Just mix them in and then put that on one side.
4. Pit the fresh cherries. If you haven't done this before, get yourself a paperclip or a small knife. Take the stalk off the cherry and insert your implement and dig the pit out. Try to be neat about it but don't worry if you make quite a big whole as that part will be against the cake, or you can fill it with cream like my friend Jess did with one!
5. Spread your jam on top of the bottom layer of the cake. 

The Syrup:

1.  Don't make the same mistake as me! Wait until your cake is out of the oven and cooling before you start this stage or your syrup will caramalise which is still usable but not quite as good. First you want to heat up your 50g caster sugar with 2 tbsp water. Not for too long. Just until it's starting to look quite syrupy.
2. Take the pan off the heat and add in your cherry liqueur. Let it cool a tiny bit and then drizzle a small spoonfull over the top layer of your cake. If it stays sticky after ten to twenty secs, you're good and you can go ahead and spread the rest over the jam on the bottom layer of cake. If it solidifies, you've caramelised it but no worries. This just means you'll want to drizzle it over the bottom layer instead of spreading. It will be a little crunchy but it will still taste real good and you just want to make sure that you end up with lines or swirls of it instead of a big solid lump. That way your cake won't be impossible to cut.

The Finishing Touches:

1. Go find the cream that has cherries in it! You want to put this over that layer of syrup and use it to sandwich the two cakes together.
2. If you have a piping set, fill it up with cream and decorate the top however you like. If not, do the same but use a knife or spoon. Add the pitted cherries in, grate the dark chocolate over the top and voila! Your cake is done.

The Evaluation

4/5 stars: Taste.
3/5 stars: Ease of recipe. Not one to try if you've never made a cake before but it's easy enough.
5/5 stars: Presentation. It looks pretty awesome.
3/5 stars: Time to make. This is pretty lengthy. Prep is about an hour and then there's baking time and decorating too. Best to make it a day in advance if you need it for an event.
5/5 stars: Overall success.

_______________________
Well hello there readers! So this recipe is a great one. You guys should try making it and if you do, post your photos and feedback here! It's a really tasty dessert and great if you have a few friends around. Many thanks to Jess for the help decorating! We might have had a bit too much fun there lol. I'll leave you with a few more photos. Oh and I forgot to add the chocolate on top before we helped ourselves to a few pieces. I know. I'm just a cooking disaster waiting to happen with all my substituting and forgetting!